A worn out toilet flapper could scare the wits out of you by flushing the toilet at weird hours of the night. It could also cost you hundreds of dollars in water bills when it lets water to sip into the bowl. A beaten flapper is also the first suspect when a toilet won’t flush.
Our editors independently research, select and recommend the best products. Some of these may be affiliate based, meaning we earn a small commission (at no additional cost to you) if items are purchased.
First, some general knowledge:
What Is A Flapper?
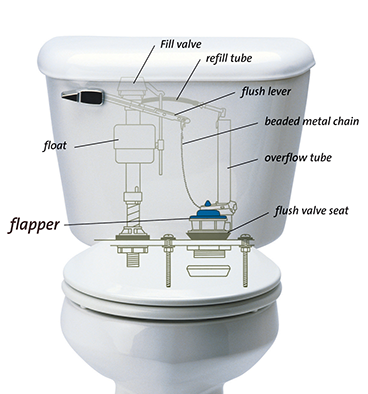
image credits: http://www.toiletflapper.org
A flapper (a.k.a flush valve seal) refers to a plug found at the bottom of your toilet tank. This unit connects to the flushing handle through a chain. Its role is to hold the water in the tank before and after flushing by sealing the drain hole.
How Does A Flapper Work?
The flush valve seal works in tandem with the flushing handle to hold and release the water in the tank throughout the flushing cycles. When you pull down the handle or press the flush button, as it’s the case with the Woodbridge T-0001 Dual Flush Toilet, the flapper is lifted up by the chain.
This breaks the seal and water runs down into the toilet bowl. Immediately after the first flush, the flapper swings back down to its position over the drain hole to prevent more water from going through. This allows the tank to fill again for the next flush.
If you have a running toilet (where the water flows continuously into the bowl) or the toilet flapper closes too soon, it’s very likely that the flapper is worn out and requires replacement.
Tip: Sometimes, a flapper that is not completely worn out may cause you a ‘silent toilet flapper leak.’ This is worse since water can continue running down unnoticed for months or even years depending on how attentive you are to your fixtures.
If you suspect that your toilet is leaking, the dye test method as shown in this video is a sure way of clearing the doubts.
How to Replace a Toilet Flapper in 8 Steps
The thing with most toilet problems is that almost anyone can fix them. Replacing the flapper is, in my opinion, the simplest of them all.
Before you start to replace your toilet flapper, make sure you have on hand:
- a new flapper
- rubber/latex gloves
- needle-nose pliers (to get things done)
- a few minutes
Next, follow these steps to replace the flapper:
Step 1: Take off the lid.
If you are dealing with a modern fixture like the Kohler K-3987-0 Wellworth toilet that has a porcelain ceramic lid, you really want to be extra careful with the cover. This is because the lid is easy to break but very hard to get a replacement.
Step 2: Shut off the water valve and flush the tank.
Turn off the water that enters into the cistern by turning the shut-off valve clockwise. This valve is mostly positioned just below the container. Try to turn it off entirely so that no water trickles in.Next, empty the cistern by flushing it. You might want to hold on to the flushing handle so that almost all the water is eliminated.
Step 3: Pull out the old flapper.
Removing the current flapper is easy.However, it varies depending on the type.For flexible flush valve seals (these are made of all-rubber or silicone), use needle-nose pliers to detach the chain from the flushing lever.
Next, move either of the arms toward the post and slide it over the ‘’L’’ portion to disengage it.
Follow the same process to remove the other arm. The flapper should be out by now.
Solid frame flappers (made of hard plastic) come in 2 types depending on how they mount on the posts. Regardless of the mechanism used, they all have a chain or strap that attaches them to the flush handle. Remove it before moving on. If it has an open loop, simply extend one of its ears with one hand while holding the post with your other hand to avoid causing damage to the post.
Repeat this for the other arm.
If it has a closed loop, move the arms to one side, for instance to the right. Now take the right arm and gently pull and lift it from the post. Push the flapper to the other side and repeat this for the left arm.
Step 4: Find a replacement for the old flapper
You can easily find the best toilet flappers in most hardware and old improvement stores and cost a few bucks. With the recent advancement in toilet architecture, there is nothing like a standard flapper.It’s important that you take your old flush valve seal to the store near you and ask for a unit that matches it.
Step 5: Clean the area around the seal
Before mounting your new flapper, it’s advisable that you clean the seal area to remove any dirt or residue that might have chipped out from the previous seal. You could use a clean cloth or sponge for this.
Step 6: Install the new flapper
Usually, the process of installing the new seal is just as simple as it was to remove the previous flapper.For a flexible flapper, hook one of the ears down the ‘’L’’ post and slide it toward the tube. Repeat the same for the other ear.
To install an open-looped hard plastic flapper, simply align the loops with the pegs and gently snap the ears into place.
For a closed-loop hard plastic model, hook the ears of the flapper onto the post’s pegs. Next, connect the chain/strap to the flashing lever. Ensure that the lever is in its resting position and that it has very little slack.
Important: If the chain/strap is too tight, do know that the toilet flapper won t close completely. Hence the water might sip through. Again, if it’s too loose, then the seal won’t open high enough to allow enough water through.
Step 7: Fill the tank
Test to see whether your new flapper is ready for the job and adjust the chain accordingly. Once you are content that the seal is working properly, cut the leftover chain. This is vital because the overhanging bit could get in the way of the seal and prevent it from sealing completely.
Step 8: Replace the lid
If you are satisfied that the toilet is working properly, replace the lid and turn ON the water valve.
You are done!
